

Draw Me As A Disney Character
Animating Yourself as a Disney Character with AI
Sneak peek into the future of digital arts
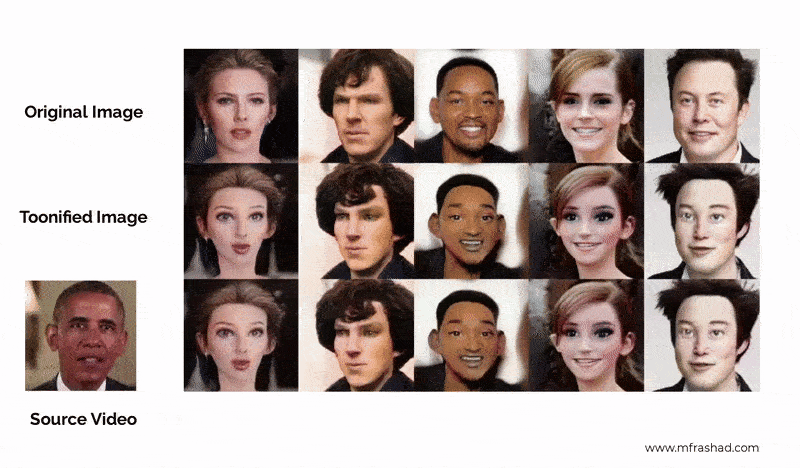
Last week, I was surfing the internet and stumbled upon an interesting article on StyleGAN2 network blending by Justin Pinkney. What's so interesting about it? Someone made a cool app with the idea! Doron Adler fine-tuned a StyleGAN2 model with Disney characters and then mixed the layers with the real face model (FFHQ) and generated Disney characters based on real faces.
Then, Justin Pinkney followed up by making the model available on Toonify. You can simply upload your picture and instantly get your Disney character. Try it out!
But, in this article, we will learn how to do this programmatically and also animate the character!
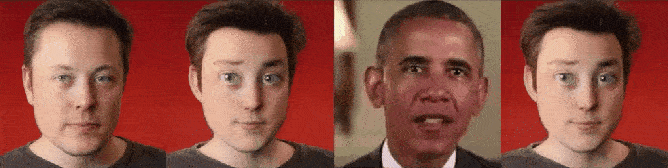
Table of Content
- GAN
- StyleGAN
- Toonification with Layer Swapping
- Animating with First Order Motion
- Tutorial
If you do not want to learn the theory and go straight to coding, you can skip to the tutorial.
Generative Adversarial Network (GAN)
The core mechanism behind this character generation is a concept called Generative Adversarial Network (GAN) which is extremely popular right now in the community due to its generative applications. What is GAN? It's basically 2 networks trying to compete with each other, the generator and the discriminator. The generator tries to fool the discriminator into believing its generated image to be real, while the discriminator tries to classify between the real image and the fake (generated) image.
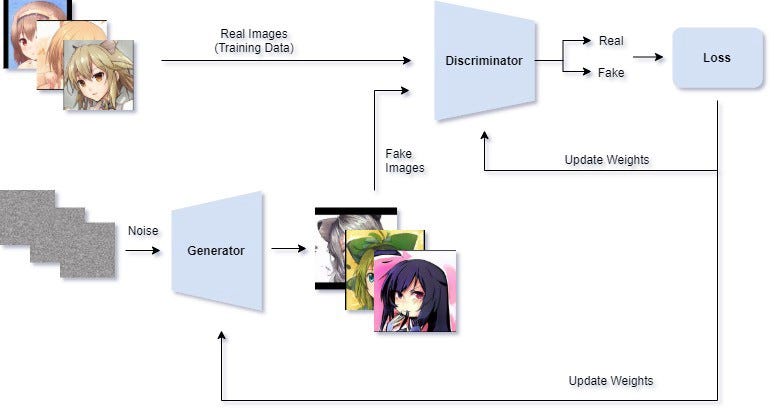
The discriminator will be trained first by showing it the real image from the dataset and random noise (images from the untrained generator). As the data distribution is very different, the discriminator will be able to differentiate easily.
Disclaimer: The illustration may not exactly accurate in representing what's happening in GAN as I try to simplify it as much as possible.
Then, we will switch to train the generator while freezing the discriminator. The generator will learn how to generate better images based on the output of the discriminator (real or fake) until the discriminator cannot discriminate correctly anymore. Then, we switch back to training the discriminator and the cycle continues with both of them getting better until the generator reached the point of generating a very realistic image and you can stop the training.
StyleGAN
In 2018, NVIDIA published a groundbreaking paper that manages to generate high-quality images (1024x1024) titled "A Style-Based Generator Architecture for Generative Adversarial Networks". One of the novelty is that it disentangles the latent space which allows us to control the attributes at a different level. For example, the lower layer would be able to control the pose and head shape while the higher layer control high level features such as the lighting or texture.
The disentanglement is done by introducing an additional mapping network that maps the input z (noise/random vector sampled from a normal distribution) to separate vector w and feed it into different levels of the layers. Hence, each part of the z input control a different level of features

Hence, if we change the input in the lower layer (4x4, 8x8), we would have variations in the high-level features such as the head shape, hairstyle, and pose.

Analyzing and Improving the Image Quality of StyleGAN]
On the other hand, if you change the input for the higher layer (512x512, 1024x1024), we would have variations in the finer features such as the lighting, skin color, and hair color.

Analyzing and Improving the Image Quality of StyleGAN]
We can attempt to further visualize the disentanglement by analyzing the activation maps and cluster the activations as done by this paper.

The color represents a cluster formed where you can think of it as the controllable part of the image. In the last layer, you can see that different parts of the lighting are represented as different clusters. In the middle layers, the facial feature such as the eye, nose, or mouth is represented as different clusters which means this is where the variations in the facial features are controlled. Finally, in the first few layers, different parts of the head are represented as different clusters which proves that it controls the shape, pose, and hairstyle of the person.
You can watch the presentation video of the paper here.
Besides the disentanglement, StyleGAN also made several other improvements such as progressive growing architecture. Although they switched to architecture similar to MSG-GAN in StyleGAN2. For the latest update, you can read the paper or just watch the StyleGAN2 demo video below.
I also use the website to keep track of new papers on CVPR and ECCV this year. So, it's pretty useful.
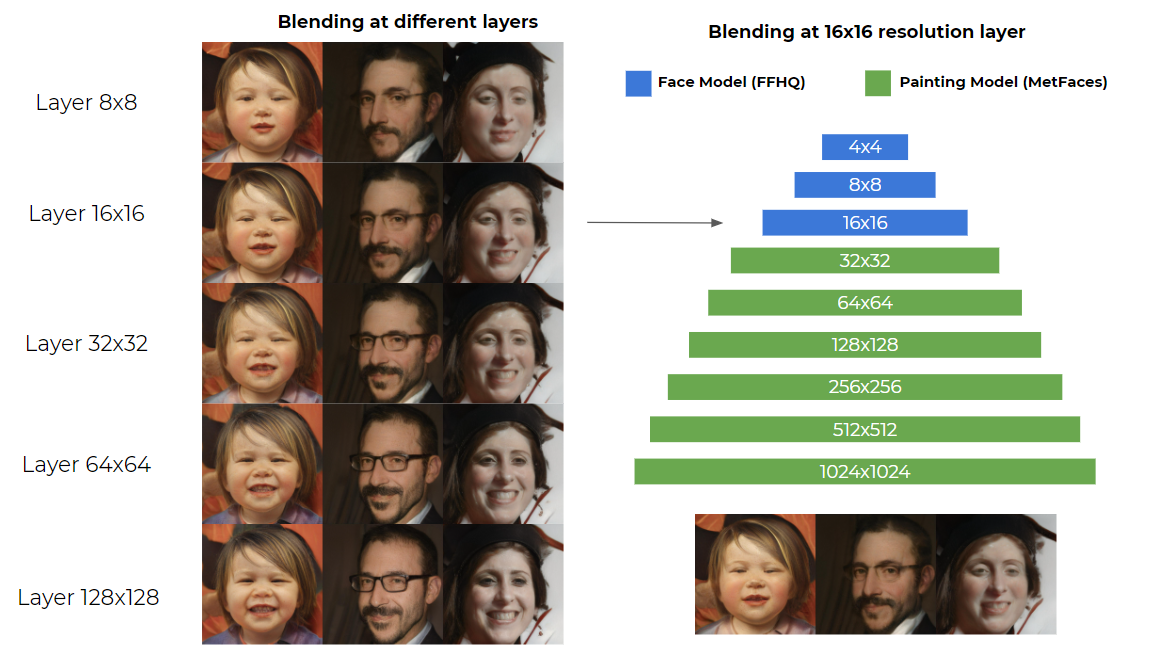
StyleGAN Network Blending
The particular disentanglement feature of StyleGAN is what enables us to mix different models and generate Disney characters from a face. If the first few layers control the facial feature and the last few-layer control the texture, what if we swap the last few layers with another model's layers?
For example, if we use the weights of the face model for the first few layers and the weights of the painting model for the rest of the layer, it will generate the face with the painting style! Moreover, not only it can copy the texture of the second model, but it also able to copy the facial feature style of the different models such Disney character eye or mouth.
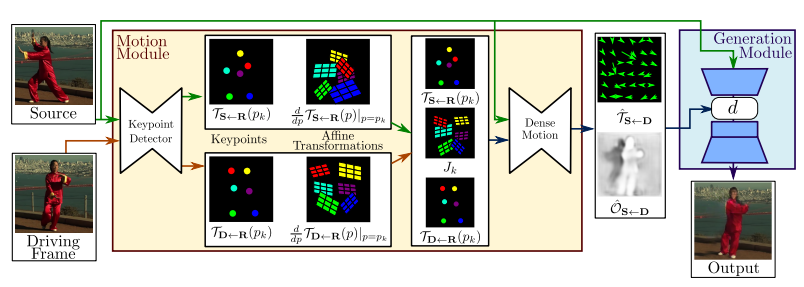
First Order Motion Model
After we generated the Disney character, why not take it to another level and animate it? An interesting paper titled "First Order Motion Model for Image Animation" provided us just the ability to do that. Basically, it tries to learn the motions from the driving video using keypoints and attempts to morph the input image to enact the motion.
Tutorial
Now that we understand a bit about the concept, let's do it and code! Luckily, Justin Pinkney made his Toonification model available and created a Colab for it. I made another Colab notebook which is basically his code with additional code for the animation modified from Aliaksandr Siarohin's notebook.
Here is the Colab notebook for you to follow along!
First, make sure you are using GPU runtime and Tensorflow 1.
%tensorflow_version 1.x Note: % is a special command in Colab, it will not work if you are doing this locally
Next, we clone the repo and create folders that we will use.
          !git clone https://github.com/justinpinkney/stylegan2
%cd stylegan2
!nvcc test_nvcc.cu -o test_nvcc -run
!mkdir raw
!mkdir aligned
!mkdir generate
Note: '!' is used to run a shell command in Colab, if you are doing this locally, simply run the command on your shell/console.
Next, upload your image inside the raw folder, we will use a script to crop the face and resize the image, hence your image does not have to be a full face. But for better results, make sure your face would have at least 256x256 resolution.
In this example, we will use the Elon Musk image as an example.
!wget https://drive.google.com/uc?id=1ZwjotR2QWSS8jaJ12Xj00tXfM0V_nD3c -O raw/example.jpg 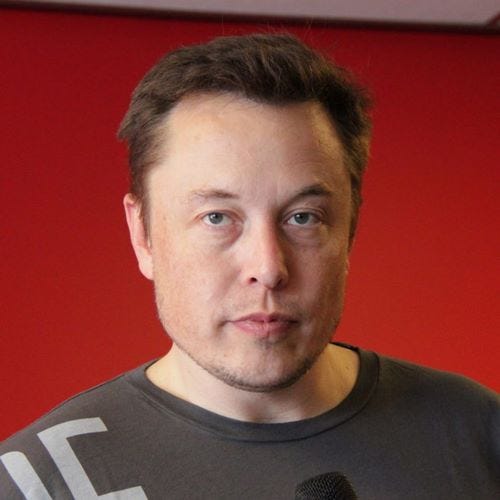
Then, we will load the blended model of the real face and Disney character by Doron's Adler and also the normal FFHQ face model.
Why did we need to load the normal real face (FFHQ) model as well? Remember that the StyleGAN model only takes the latent vector z and generates a face based on the latent vector. It does not take an image and transform the image like Image-to-Image translation model.
So how do we generate a face that we want? StyleGAN2 introduces a method of projecting to the latent space. Basically, we can try to find the matching latent vector for our desired image using gradient descent.
But before we try to find the matching latent vector, we need to crop and align the image first.
!python align_images.py raw aligned The script takes the source image directory and the output directory as the input and will crop and align our face properly.

Finally, we will project the image to the latent space.
!python project_images.py --num-steps 500 aligned generated The script will take the images in the aligned directory and create the latent vector saved as .npy file in the generated folder.
Now that we have the latent vector, we can try to generate the faces using our blended Disney model.
The generated images are saved inside the generated folder. We can display the images inside the notebook.
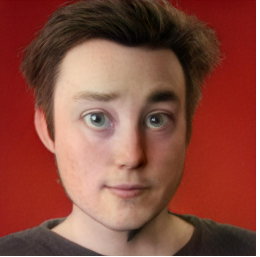
Voila! We have a Disney-fied Elon Musk, but we are not done yet. Let's animate this!
First, let's clone Aliaksanr's repo on the first-order model.
!git clone https://github.com/AliaksandrSiarohin/first-order-model Then, we will set up a path, so we do not have to be in the first-order-model directory todo the python import or you can just cd to the directory.
Then, before we load the keypoint and video generator model, we need to download the pre-trained weight first. The file is quite big ~700 MB, and you may need to download it manually as Google does not allow the download of large files with wget.
!wget "https://drive.google.com/uc?export=download&id=1jmcn19-c3p8mf39aYNXUhdMqzqDYZhQ_" -O vox-cpk.pth.tar Load the first-order model using the downloaded weight just now.
Next, we need a driving video from where we would source the animation from. You can use the example video or upload your own video. If you upload a video, make sure to change the file path accordingly.
!wget https://drive.google.com/uc?id=1LjDoFmeP0hZQSsUmnou0UbQJJzQ8rMLR -O src_video.mp4 Finally, we can generate the animation!
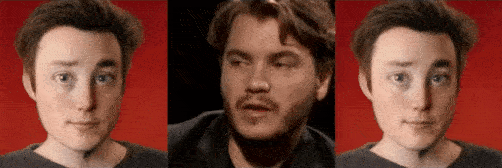
Yay! We finally animated our character. Congratulations to you if you manage to reach this point 🎉
What's Next?
There are a lot of things we can still experiment on. What if we blend other models such as the painting's model or we can also reverse blend the Disney character and paintings where we generate a real face based on a Disney character or the painting. We can also try to incorporate Deepfake and swap the faces within Disney movies with our Disney character.

Draw Me As A Disney Character
Source: https://towardsdatascience.com/animating-yourself-as-a-disney-character-with-ai-78af337d4081
Posted by: richardswhishour.blogspot.com
0 Response to "Draw Me As A Disney Character"
Post a Comment